| |
| | Create and mount VHD files in Windows 7 By dothy1005
12-10-2010
| | |
|
VHD (Virtual HardDrive) file support is a back up program that has been introduced in Windows Vista and was greatly improved in Windows 7. With this support program, users can create a system back up to VHD and also boot from a VHD file. If there is a need for you to edit a specific VHD file, you may do so by mounting the VHD file for editing using Disk Management.
1. First, click on your Start button and type in diskmgmt.msc on the box. Hit Enter.
2. As soon as you open Disk Management, go to the menu bar and click on Action. Then, select Attach VHD.
3. Next, go to the location of your file and tick on Read-only. This step will avoid writes to your VHD file.
4. Once you hit OK, the drive will now be visible in Disk Management. You will notice that this will have a blue icon. Now, you may access the F: drive in Explorer.
5. Lastly, if you need to un-mount the VHD file, go back to Disk Management and right-click on the left side of the drive that you see on the list and choose Detach VHD.
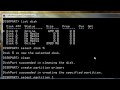
Additionally, the command line DISKPART utility has been improved with tools to detach a VHD file, and an EXPAND command to extend the maximum size of a virtual disk.
|
| |