OpenVPN easy setup with Untangle
A VPN (Virtual Private Network) is a secure way to connect and control computers, servers, and access shared network drives and files through the internet
even when you are outside of your home/office network.
You can use a VPN through the following options:
1. Purchase commercial VPN solutions
2. Setup your own VPN server
3. Setup your own VPN through an advanced router
In this tutorial, I'll give you an overview of how you can setup a free VPN server program called "OpenVPN" and use it with a free Firewall program like
Untangle.
1. Download and install Untangle (
Untangle: Network Policy at Work)
2. Add the OpenVPN Application to your Untangle Apps. Click Settings

3. You may be asked to select the mode of VPN to setup. Choose "Server"

Explanation:
A VPN operating in Server mode -- allows you to connect to it, and it acts as a server that allows you to pass through and connect your computerto the
home/office network. This is the typical VPN operation mode to select.
A VPN operating in Site-to-Site mode -- allows you to connect an existing VPN enabled office to another VPN enabled office -- thereby securely joining the
two remote offices via VPN connection. This mode is used if you already have established a VPN server on at least two networks.
4. Notice the "Clients" tab.

Since we are setting up a Server mode VPN, the clients Tab will soon populate with the VPN account names that we will create.
The Sites tab will be empty as it is used only in VPN Site-to-Site mode.
5. The Exported Hosts and Network is usually pre-checked by OpenVPN. It automatically detects your home/office network and allows for it to accept VPN
connections.

6. The Advanced tab is where we configure the few settings of OpenVPN.
 Export DNS
 -- if you enable this, clients that connect to your VPN server will use the DNS settings that your home/office network uses. If you have an
internal Domain setup on your home/office, it is suggested to turn on this feature.
Full Tunnel -- this is an optional step for many VPN installations. Enabling a Full Tunnel VPN makes the remote client forward ALL of its internet
data to your VPN server even if it is possibly not intended for the home/office network. In example, turning on a full tunnel VPN will make the remote laptop
send the request to look for Gmail.com to your VPN server first, your VPN server will then reply that it is not GMail.com, and will forward you to the
internet.
A full tunnel option is best used if you are implementing very strict IT policies and security while a user is connected to your VPN. Implementing a full
tunnel also slows the general internet browsing of your remote clients while connected to your VPN. For our overview, a Full Tunnel VPN is not needed.
Site name -- Input a descriptive name for your VPN network
DNS Override -- Enable this if you are using the Export DNS option
7. The
Connection Event Log -- The list shows the recent VPN connections made to your network. It is helpful to check this tab for any troubleshooting
and monitoring events on your VPN. The list will populate as more VPN connections are made.

========================================
ADDING USERS TO YOUR OPENVPN SERVER
Now that you have configured the VPN server, it is time to add user accounts for you and your remote team mates.
1. Click the Clients tab, and click Add new client

Input a descriptive client name. This is best to be similar to the user's email address or login name.
Leave the Address Pool selected as Default
The checkmark for "Enabled" means that the Client name is allowed access to the VPN.
2. A VPN username is now created, but we still need to acquire each user's pre-configured VPN Client installer.
**A VPN client installer is a program that needs to be installed on the remote computer/ laptop that the remote worker will be using to connect via VPN.
Simply put, the VPN client needs to be installed on your home laptop if you want to enable it to connect to the Office network. You'll also need to have the
VPN client software installed on the office laptops so they can access the office VPN network when they are on-site and out of office.
Click on an OpenVPN username, and click "Distribute Client"

A pop-up window appears that gives you two links for download.
The first link allows you to download the VPN Client installer
The second link allows you to download a much smaller file called the "vpn config file"
For ease of use, and simplicity, it is best that you download the VPN Client Installer.
The VPN Client installer contains a pre-configured installer that is ready for installation on the remote home laptop. Copy this installer to the remote or
home computer, and install it. It will automatically pre-cofingure the home/remote computer to have the username and password that is required to access our
OpenVPN server. If the remote user has a second laptop, he can use the same installer and it will install with his OpenVPN credentials.
It is therefore necessary to secure the VPN installer file to be accessible only to the specific user. The VPN installer file carries the user's identity for
establishing the VPN connection.
***A VPN config file is indeed a much smaller file download, but it contains only the settings and security certificate files. It does not contain the actual
software for connecting to any VPN server. Use this option if you already have an existing VPN installation and will need to connect via devices like
computers, mobile phones, and tablets.
3. Distribute the per-user VPN installer file via email or manual file sharing among the specific users. OpenVPN allows the option for emailing the VPN
installer file. This is helpful, but I personally suggest manually downloading each user's installer and manually emailing each user the installer. This way
you have a saved copy of each user's VPN installer. This will be more helpful if the user needs to re-install. You can fetch from your email's sent items.
===========================================
INSTALLING THE VPN CLIENT AND MAKING YOUR FIRST VPN CONNECTION
Now that you have distributed each user's VPN installer file, I'll walk you through its installation and making your first VPN connection.
1. Launch the msi installer for the client and click next

2. Read and accept the License and click next

3. Choose the location to install the program files for the Desktop Client and click Next

4. You are now ready to install the Desktop Client, click Install to proceed

5. Please wait while the Desktop Client Installs

6. You may see a warning asking you to install the Desktop Clients TAP Adapter, check the box that says "Always trust software from "OpenVPN Technologies, Inc." and click Install

7. The Desktop Client is now installed, click Finish to complete the installation.

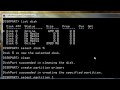
8. Launch the OpenVPN Client, and click Connect
[IMG]http://i.imgur.com/n8KI4cq.png[/
The OpenVPN Client shows several initialization and connection status messages. It shows a green icon to indicate that your VPN connection has successfully connected.

You are now connected to the VPN! Even from the internet and outside of your home/office network, you have access to the local office network and shared drives and folders.


 How to setup an OpenVPN server and remote clients